docker image 를 통해서 기본 환경 설정은 끝났습니다.
이제 genesis 블록이라는 블록체인의 최초 블록을 설정해 줘야 합니다.

제 PC상 D드라이브의 Works\Go-Ethereum 이 Home 디렉토리(폴더)입니다.
여기서 geth_data 란 디렉토리를 만들고
그 안에 genesis.json 파일을 만듭니다.
파일 IDE 는 범용으로 사용하기 편한 Visual Code 를 사용하였습니다.
genesis.json 파일 내용
{
  "config": {
        "chainId": 70701,
        "homesteadBlock": 0,
        "eip150Block": 0,
        "eip155Block": 0,
        "eip158Block": 0
    },
  "alloc"      : {},
  "coinbase"   : "0x0000000000000000000000000000000000000000",
  "difficulty" : "0x100",
  "extraData"  : "",
  "gasLimit"   : "0x2fefd8",
  "nonce"      : "0x0000000000000042",
  "mixhash"    : "0x0000000000000000000000000000000000000000000000000000000000000000",
  "parentHash" : "0x0000000000000000000000000000000000000000000000000000000000000000",
  "timestamp"  : "0x00"
}
이런식으로 작성하면 됩니다.

설정중에 수정할 만한 것은, chainId (블록체인id), difficulty (채굴 난이도), gasLimit (거래 수수료) 정도입니다.
이제 docker 를 이용해서 초기화를 해줍니다.
보통 docker run 명령어로
| docker run -v ${pwd}/eth_data:/root/.ethereum ethereum/client-go init /root/.ethereum/genesis.json |
처럼 사용하는데, 보기 불편하니 설정파일로 처리해 봅시다.
docker-compose 를 사용하면, docker를 사용할때 뒤에 run 뒤에 저 복잡해 보이는 파라메터를
좀더 보기 편하게 할 수 있습니다.
홈 디렉토리에 geth-init.yml 파일로 아래와 같이 만들어 줍니다.
# 초기화 작업 실행은 아래 명령어로
# docker-compose -f ./geth-init.yml [up/down]
version: '2'
services:
  init:
    image: ethereum/client-go
    command: init /root/.ethereum/genesis.json
    volumes:
      - ./geth_data:/root/.ethereum
이렇게 보니 좀더 보기 편하실거라 생각합니다.
-v 옵션은 volumes, 실제 윈도우 탐색기로 보이는 폴더랑, docker 내부(리눅스) 디렉토리를 마운트 해주는 설정 입니다.
-v ${pwd}/geth_data 를 /root/.ethereum 에 연결하라 란 거고. 콜론(:)으로 구분하고 있죠.
compose.yml 파일의 자세한 옵션은
https://docs.docker.com/compose/compose-file/compose-file-v2/
Compose file version 2 reference
docs.docker.com
그 다음 image 이름 요 전 포스트에서 docker로 image 다운 받은 그 이름 입력이고, 뒤에 init 부터는 명령어 입니다.
실행은 VC 내부 터미널 (기본 power shell) 에서 위에 주석(맨앞에 #)으로 처리한 명령어를 입력해 줍니다.
docker-compose -f .\geth-init.yml up |
초기화가 되었으니, image app 는 다시 내려줍니다.
| docker-compose -f .\geth-init.yml down |
아까 volumes 로 마운트 된곳 폴더를 보면 여러 파일들이 생성되어 있음을 알 수 있습니다.

이제 genesis 블록 초기화 설정은 되었으니
node 모드로 띄어 보도록 합시다.
docker로 하면 설정이 많으니, docker-compose 를 이용합니다.
geth-node.yml 파일을 아래와 같이 작성합니다.
version: '2'
services:
  geth:
    image: ethereum/client-go
    container_name: geth_container
    command: --networkid=456 --port=30303 --maxpeers=10 --http --http.addr="0.0.0.0" --http.port=8545 --http.corsdomain="*" --http.api="admin, debug, web3, eth, txpool, personal, ethash, miner, net"
    volumes:
      - ./geth_data:/root/.ethereum:rw
    ports:
      - "30303:30303" # peer 연결용
      - "30303:30303/udp" # peer 연결용
      - "8545:8545"   # remix 연결용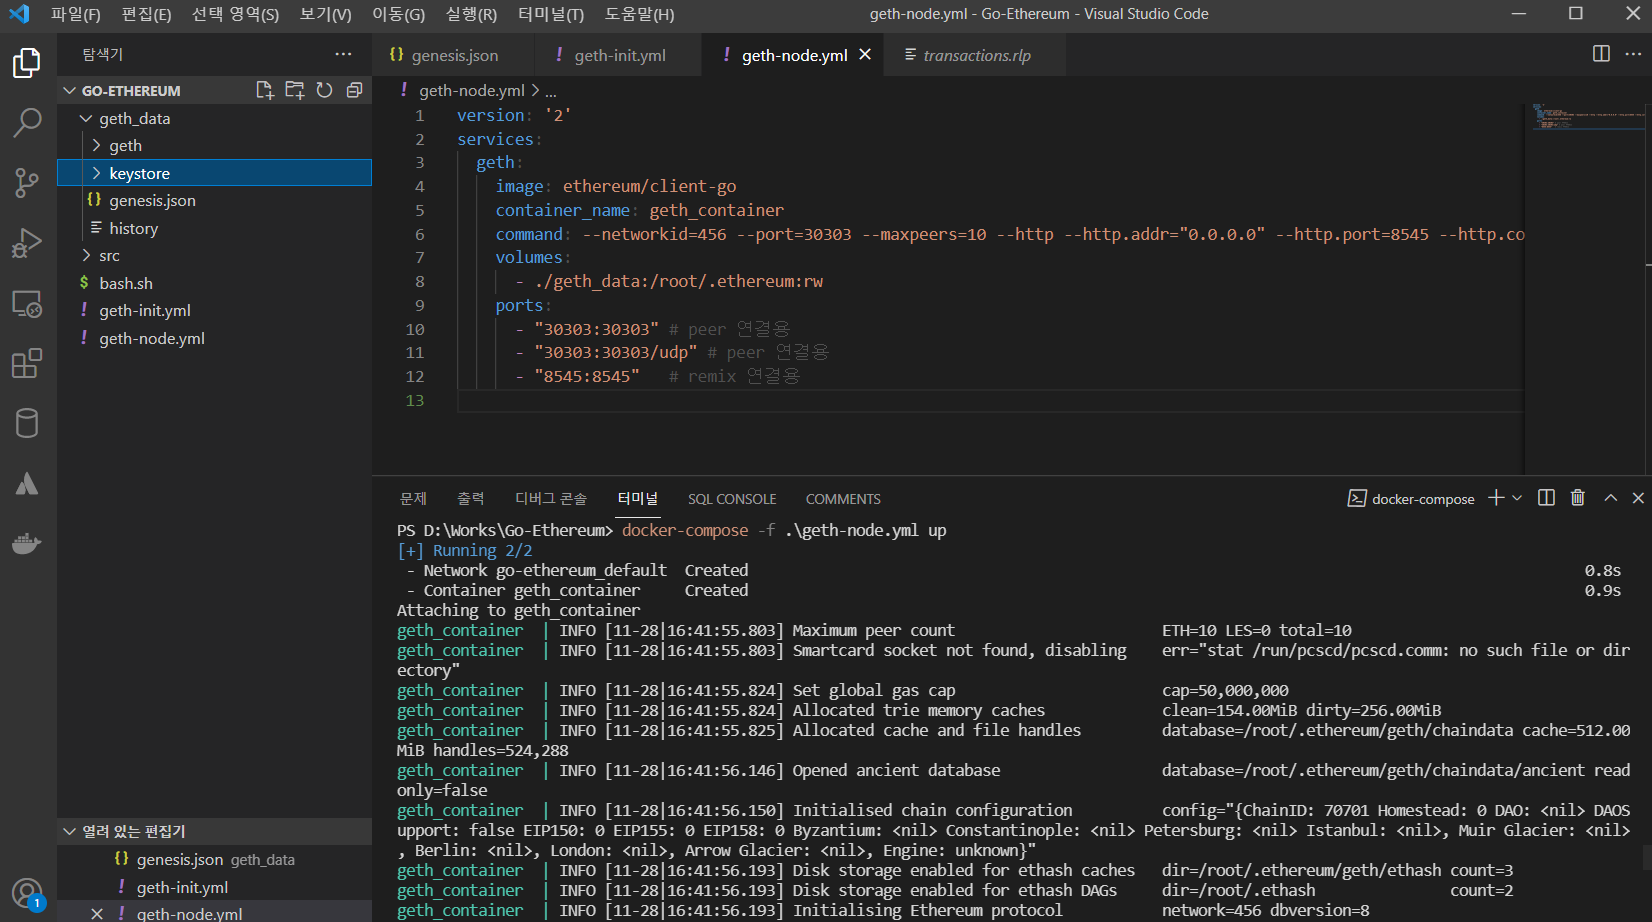
명령라인에 여러 옵션들이 있는데 옵션에 대해선
https://geth.ethereum.org/docs/interface/command-line-options
https://pmgreviewer.tistory.com/10?category=890514 이부분을 참고 하면 좋을거 같습니다.
대충, 네트워크id 456번으로 지정하고,
peer 연결에 사용할 listen port 로 30303 을 사용하고 (그래서 ports: 로 30303을 뚫었습니다. 8545는 웹에 연결할건데 이건 나중에 보죠),
다른 여러 예제들 보면 --rpc 옵션을 지정하게 되어 있는데,
최근 버전에는 rpc 옵션이 삭제되서 이대로 사용하면, 도커가 실행이 안됩니다.
rpc 옵션에 대해서는 http 로 대체 되었는데, 옵션 내용은 아래와 같습니다.
추가로 http.addr=0.0.0.0 으로 지정했는데, 도커에서 저렇게 해줘야 host(윈도OS)에서 localhost 에 접속이 가능합니다.
| API AND CONSOLE OPTIONS: --ipcdisable Disable the IPC-RPC server --ipcpath value Filename for IPC socket/pipe within the datadir (explicit paths escape it) --http Enable the HTTP-RPC server --http.addr value HTTP-RPC server listening interface (default: "localhost") --http.port value HTTP-RPC server listening port (default: 8545) --http.api value API's offered over the HTTP-RPC interface --http.rpcprefix value HTTP path path prefix on which JSON-RPC is served. Use '/' to serve on all paths. --http.corsdomain value Comma separated list of domains from which to accept cross origin requests (browser enforced) --http.vhosts value Comma separated list of virtual hostnames from which to accept requests (server enforced). Accepts '*' wildcard. (default: "localhost") --ws Enable the WS-RPC server --ws.addr value WS-RPC server listening interface (default: "localhost") --ws.port value WS-RPC server listening port (default: 8546) --ws.api value API's offered over the WS-RPC interface --ws.rpcprefix value HTTP path prefix on which JSON-RPC is served. Use '/' to serve on all paths. --ws.origins value Origins from which to accept websockets requests --graphql Enable GraphQL on the HTTP-RPC server. Note that GraphQL can only be started if an HTTP server is started as well. --graphql.corsdomain value Comma separated list of domains from which to accept cross origin requests (browser enforced) --graphql.vhosts value Comma separated list of virtual hostnames from which to accept requests (server enforced). Accepts '*' wildcard. (default: "localhost") --rpc.gascap value Sets a cap on gas that can be used in eth_call/estimateGas (0=infinite) (default: 50000000) --rpc.evmtimeout value Sets a timeout used for eth_call (0=infinite) (default: 5s) --rpc.txfeecap value Sets a cap on transaction fee (in ether) that can be sent via the RPC APIs (0 = no cap) (default: 1) --rpc.allow-unprotected-txs Allow for unprotected (non EIP155 signed) transactions to be submitted via RPC --jspath loadScript JavaScript root path for loadScript (default: ".") --exec value Execute JavaScript statement --preload value Comma separated list of JavaScript files to preload into the console |
geth | Part_5 번외편_geth 실행 시, 옵션
Geth 실행 옵션 geth를 실행 할 때 필요한 옵션의 종류에 어떤것들이 있는지 알아보도록 하겠습니다. geth help를 치면, 아래와 같은 결과창을 볼 수 있습니다. * 훨씬 더 많습니다. 그 중 자주 쓰이
pmgreviewer.tistory.com
이렇게 실행시키면 VC내 터미널도 그렇고 윈도우 도커에서도 로그가 계속 남고 있음을 확인 할 수 있습니다.

이제 이 내부에 접근해서 ethereum 프로그램에 들어가서 계좌 생성이니, 마이닝이니 여러가지 해봅시다.
여기까지 제대로 실행이 되고 있으면
docker ui 창에서 run 이라고 뜰테고 위에

CLI (Command Line Interface) 즉. 터미널을 열어 봅시다.
뭔가 리눅스 스러운 창이 떳네요. 리눅스 명령어 쳐보면
geth 프로그램이 돌고 있음을 확인 할 수 있습니다.
이제 여기서 위와같이 geth attach 로 프로그램 관리자 콘솔 모드로 집입해 봅시다.

'재테크 > Go-Ethereum' 카테고리의 다른 글
| 스마트 컨트렉트를 해보기 (0) | 2021.11.28 |
|---|---|
| 이더리움 네트워크 구성하기. (네트워크 구성) (0) | 2021.11.28 |
| 이더리움 네트워크 구성하기. (계좌 만들기, 채굴하기, 송금하기) (0) | 2021.11.27 |
| 이더리움 네트워크 구성하기. (환경 설정) (0) | 2021.11.27 |